PSA: Facebook marketing is not dead.
In recent years, the social network has taken a backseat to new and exciting platforms on the rise. However, If you’ve reduced your organic Facebook strategy to posting blog articles or repurposed content from other platforms, you’re missing out on a key opportunity: Facebook Groups.
Facebook users have flocked to Facebook Groups to connect with like-minded people and participate in conversations about the topics they care about most. Marketers are taking note and are leveraging Groups to engage with their target audiences.
In this guide, learn how to create a Facebook Group and begin building a strategy to foster a community around your brand.
What Are Facebook Groups
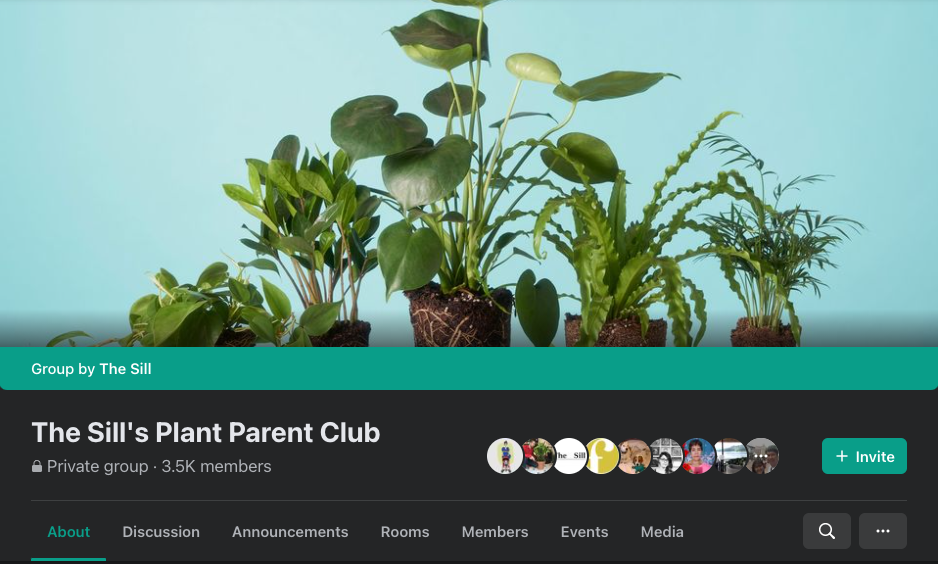
Similar to message boards or forums, Facebook Groups are spaces for discussion organized by Facebook members or brands. People can search for Groups that they’re interested in, or they can be invited to join.
In essence, groups are private spaces on Facebook, and thus they offer a different, more profound experience for members. Groups can be exclusive, meaning you must have a password or answer a set of questions to be allowed to join. The value in joining Facebook Groups lies in the conversations happening in those groups and the hyper-focused, niche content exclusive to its members.
Building a Community
Successfully managing a Facebook Group takes effort. If you want your community to thrive, you’ll need to have a dedicated strategy for your Group. This means posting different content from your Facebook page. The content must provide additional value to your members that they otherwise wouldn’t get from simply following your page. Consider trying out these tactics to drive engagement in your Facebook Group:
- Offer customer support via your group. If a customer is having an issue with a product or service, be prepared to respond. You can also address more serious issues in direct messages if necessary.
- Announce upcoming events, such as trade shows and new product lines. When you post this kind of information in the group first, members will feel privileged to be in-the-know.
- Schedule Q&A sessions to give members a chance to get to know your brand better. The conversation doesn’t have to center entirely on your business. This is an opportunity to educate your audience on the industry and establish credibility.
- Stream video content with the Facebook Live feature. You can use the stream in combination with a Q&A session. You can also conduct interviews with industry experts or use the stream to share a behind-the-scenes look at your business. Video content helps put a face to your brand and allows for more personal interaction with your community.
- Create polls and encourage members to participate. You can use polling to gauge interest in potential events or assess opinions on industry or brand changes. Use the poll results to generate conversations or make changes to the group that keep your members happy and engaged.
- Post video tutorials that teach members new ways to use your products. A meal prep brand may want to share recipe tutorials, while a fitness brand can share effective workout moves. Informative content doesn’t necessarily need to be in video format either. You can share infographics or direct members to blog posts.
- Share opinion pieces and current events stories that spark conversation among your members. Although you might want to avoid divisive topics, encourage members to discuss topics such as the future of the industry and new developments.
- Create challenges and prompts to encourage participation. These types of events don’t necessarily need to tie into your brand, but aim for a theme that loosely ties into your niche. Seasonal themes can guide your content. A fashion brand might encourage group members to share photos of Christmas sweaters or other festive outfits. Reward participating members with discounts and other goodies.
No matter what type of content you decide to share in the group, remember to do it regularly. You might even want to hold recurring events, such as Q&A sessions on a weekly basis.
How to Create a Group
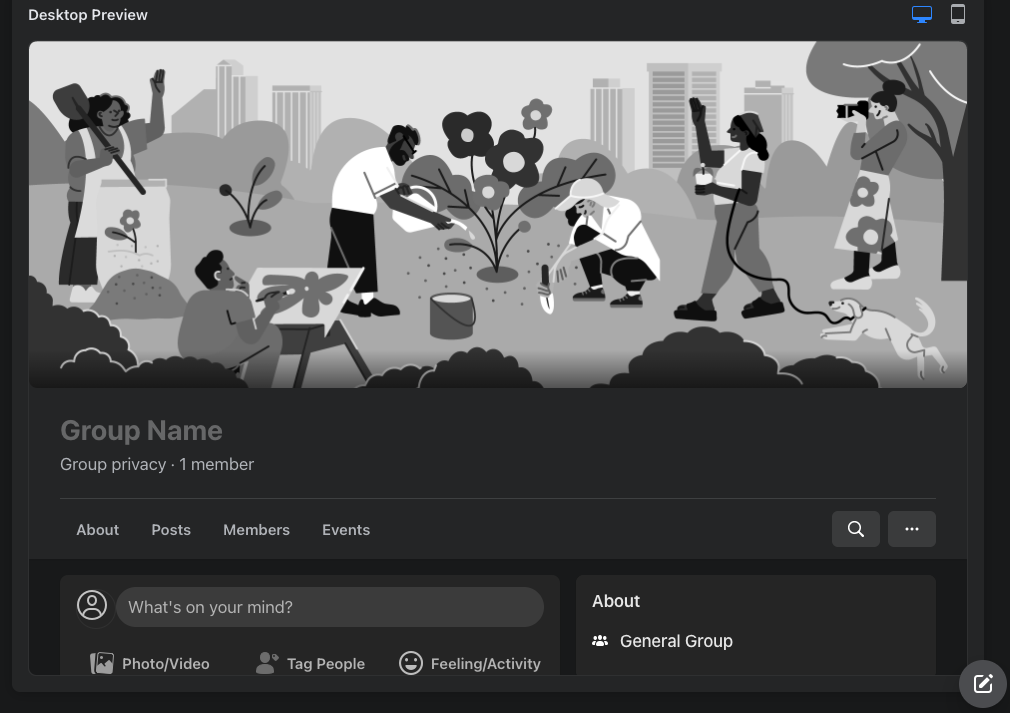
Creating a group is a simple task. Sign in to your Facebook page account and click on the “Groups” tab. Select “Create New Group.” You’ll be taken to a screen that allows you to enter a group name, select the group’s privacy level and invite people to join. Since you’re just setting up the group, start by adding one person who is part of your business.
Set Privacy
In terms of privacy level, you have several options. Set the group to “Public” if you’re willing to let anyone see who has joined the group and view the posts. You might opt for this setting if you want to promote greater transparency of your brand, increase brand awareness or allow outsiders to preview your group’s content before joining.
Set the group to “Private” if you’d like to create a more exclusive community. Only members will be able to see the posts and view a list of group members. You can also choose to make the group “visible” or “hidden.” A hidden group won’t appear in searches.
Choose a Cover Image and Set the Rules
Once the group is created, you’ll have the opportunity to liven up the page with a cover image. Choose an image that reflects your brand’s personality and sets the tone for the group. Facebook recommends using an image that is 1,640px by 856px. You’ll have the option to reposition the image as well.
Before you invite people to join the group, establish a general code of conduct in the Group Rules section. Create rules that discourage rude behavior and spam. You can remove members who break the rules.
Explore Your Management Tools
Take some time to explore additional features and learn to edit group settings before moving on to your invitation list. Options such as tags and linked pages will make it easier for people to find the group. The post moderation options allow you to monitor the type of content that appears in the group. You’ll also find a feature that lets you create posts and schedule them to appear later at a specific time.
Add Members
Ready to open the doors to your group and add members? Use an existing email list to invite your brand’s current audience to the group. Or simply use the list of your business Page’s followers. To draw in newer members, consider using an embedded “join group” button on your official website or in email newsletters, suggests Social Report.
The admins that you assign to your group will review all requests to join and either approve or deny. You have the option of creating a questionnaire for potential members to fill out before they request access. This feature allows you to screen individuals who want to join the group, and it’s a smart way to further cut down on spam. You can also establish criteria for automatic member approvals to save time and effort.

Monitoring Your Group’s Growth
If your group’s membership exceeds 50 members, you can access Group Insights. Admins can use this tool to see information such as:
- Which individuals are the most active in your group
- The time of day in which your members are most active
- Which posts generated the most likes and comments
These metrics can help you better manage your group and engage with the members. For example, if you know that your members are most active in the afternoon, you can schedule posts to appear during that time period to increase engagement. And you can use the list of top contributors to identify influential personalities. To determine what kind of content your members engage with the most, keep an eye on the list of the most popular posts and produce more of it.
Don’t feel the need to run this group all on your own. Assign moderators to help stir up conversations and ensure everyone is following the rules. If you want someone to help monitor the Group Insights, you’ll need to add another admin.